What is "The Green Art Box?" A collection of environmentally friendly kids' art projects that are; clever, imaginative
and easy-to-create! Inspired by the reuse of common household recyclables! A handy resource for teachers, parents
and home-school art curriculums. Create "green" art today!  © 2009 Broken Box Designs™

Tuesday, November 18, 2008

Thanksgiving Box


PROJECT OVERVIEW:
Create a family "Thanksgiving Box" from a shoe box... to house family members' thank you notes accumulated once a year at Thanksgiving. The notes will be kept in this box and added to each year. The notes can be shared and looked back at every year at Thanksgiving dinner. :)

SUPPLY LIST:
- empty shoe box
- pack of notecards (lined or unlined)
- scrap papers, magazines and other items to decorate with
- glue
- scissors

DIRECTIONS:
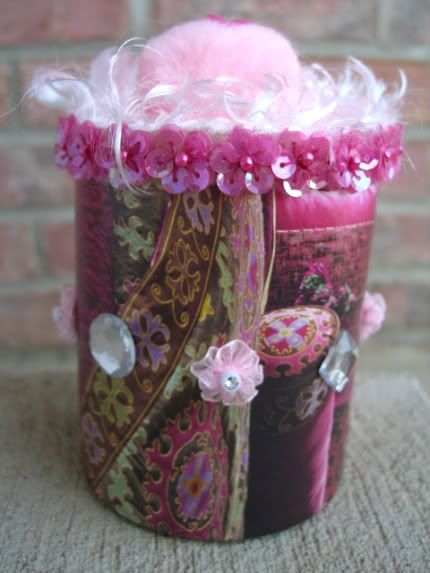
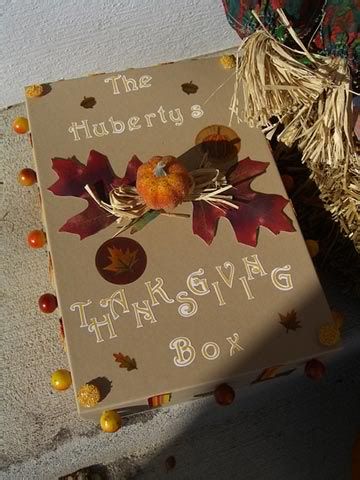
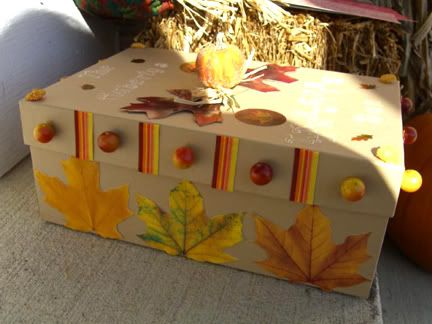
1) Find an empty shoe box. Decorate the outside of shoe box in a fun, Thanksgiving theme. Cover the entire box and lid. *Consider: fall colors, Thanksgiving icons/motifs, pilgrims, indians, etc. Good materials to decorate are: scrap papers, magazines, newsprint, junk mail, stickers, ribbon, yarn, buttons, beads, etc...

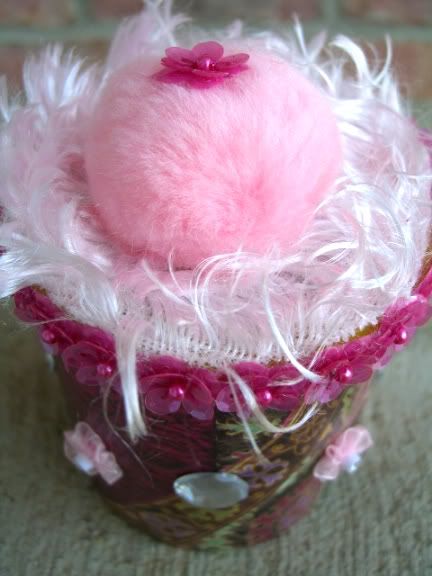
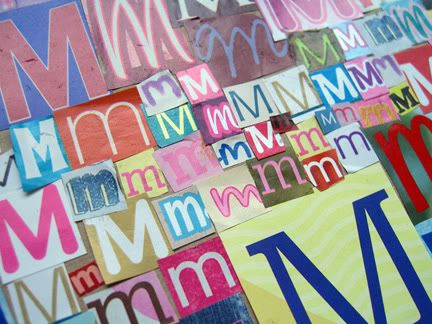
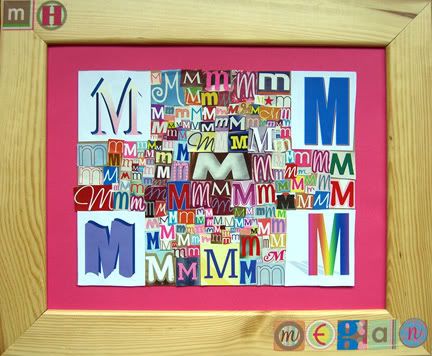
2) Decorate the lid too... adding a title to your box such as "The Sefcik Family Thanksgiving Box" or "Our Family Thanksgiving Box". Consider cutting letters out of old magazines and newsprint to write out your title. TIP: Add an old knob to the top of lid to create handle :)

3) Let entire box dry (be sure to keep lid off box while drying so it doesn't glue to box).

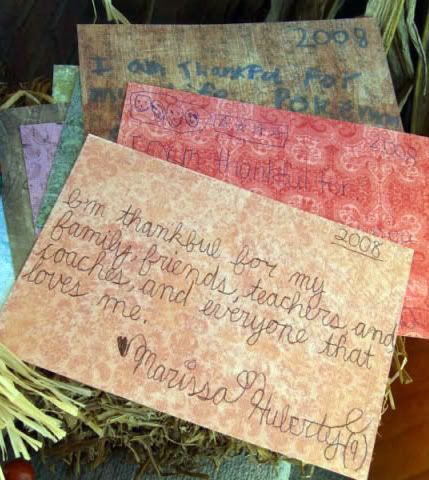
4) Put a stack of notecards inside your box for family members to write their "I am thankful for..." message on. Be sure to have each family member sign and date their message.

5) Each Thanksgiving, have family members fill out the cards and put inside box. It is fun to read past cards each year at dinner.... as well as to share the new "thank you notes."

Saturday, October 25, 2008

Nature Embellished Owl


PROJECT OVERVIEW:
To print out the owl listed in Supply List and decorate it with natural items found on a nature hunt.

SUPPLY LIST:
- download your FREE owl.pdf
- 1 sheet letter sized paper
- 1 sheet of cardboard or card stock that is larger than letter size
- glue (Elmer's or Tacky)
- scissors
- crayon, marker and or colored pencils
- pine cones, small twigs, pine needles, acorns, leaves & other small natural elements to decorate your owl

DIRECTIONS:
1) Download your FREE owl.pdf and print on a letter sheet of paper.

2) Glue the owl printout onto a thicker backing such as cardboard. Lay a heavy book on top of this so it dries flat w/out any wrinkles. (set aside to dry)

3) Go outside on a nature walk and collect pine cones, leaves, twigs and other items to decorate your owl.

4) Bring your items inside. Color your owl with crayon, marker and or colored pencil.

5) Then add natural embellishments to your owl by gluing them down on top of the paper.

6) Decorate your entire owl with natural elements, trying to decorate him with as much nature as you can!

7) Set aside to dry. Then hang up for some lovely Fall decor!

Tuesday, October 7, 2008

Leaf Silhouettes


PROJECT OVERVIEW: For kids 10+
Abstract Art: art that does not attempt to represent external, recognizable reality but seeks to achieve its effect using shapes, forms, colors, and textures.

Silhouette: the dark shape and outline of someone or something visible against a lighter background

Contrast: enhancement of the apparent brightness or clarity of a design provided by the juxtaposition of different colors or textures.

SUPPLY LIST:
- BIG piece of scrap cardboard roughly poster size (16x20).
- pencil
- 2 different contrasting colors of acrylic paint (1 light color and 1 darker color).
- paint brush and rinsing cup/paper towels
- sunny day with shadows (mornings and late afternoons work best)

DIRECTIONS:
1) Find a large piece of cardboard/matt board, as described above.

2) Choose 2 different paint colors to use (again, 1 light and 1 dark).

3) Paint your entire piece of cardboard with the lighter of your 2 colors. Let dry (acrylics dry fast but this could be done in 2 days if in a classroom).

4) When your base color is dry, take cardboard and pencil outside. Find a shadowy spot under a tree that has good leaf/branch shadows on ground. Lay your cardboard on ground so that shadows cover it and overlap across it.

5) Lightly trace the silhouette of tree/branch shadows on your cardboard. *NOTE: just trace the OUTLINE of shadows, it might not look like individual leaves to you, just COPY the shadows. **TIP: trace rather quickly, so that the sun/shadows don't move :)

6) When you are finished tracing shadows, bring everything inside and PAINT the shadows in with your darker paint color.

7) Let dry and you're done! You've made your own exclusive abstract print!

Thursday, September 25, 2008

Leaf Stencil Squares


PROJECT OVERVIEW: For preschool on up
Study the DIFFERENT shapes of Fall leaves and create art using each leaf as a stencil to trace its shape. This project also studies different 2d textures such as: print, solid color, patterns and pictures.

SUPPLY LIST:
- 4, 8"x8" squares of brown grocery bags (measure and cut the squares from a bag)
- 4, different shaped leaves (the leaf should fill up the majority of your 8" squares, aim for about 5" sized leaves) NOTE: Avoid multiple leaves on a stem, just use single leaf shapes)
- pencil
- scissors
- ruler
- glue or tape
- The following four different scrap (keyword) papers all need to be about an inch larger than each leaf, so about a 7" square). Again, try to use scrap-type papers:
1) - 1 sheet scrap paper with PRINT (newspaper or magazine prints will work best)
2) - 1 sheet scrap paper with mostly SOLID COLOR (can have some different colors or texture but should be mostly solid)
3) - 1 sheet scrap paper with a PATTERN (think polka-dots, plaid, stripes, or random shapes like clouds or balloons).
4) - 1 sheet scrap paper with a PICTURE (could be a scrap photo, illustration, painting, etc) NOTE: let the picture get cropped into your leaf stencil, we don't want the whole picture to be perfectly fit into leaf, rather it should look like it is bleeding off)

DIRECTIONS:
1) Find 4 different shaped leaves (the leaf should fill up the majority of your 8" squares, aim for about 5" sized leaves) NOTE: Avoid multiple leaves on a stem, just use single leaf shapes. Press in book if they need to be flattened some.

2) Cut and measure 4, 8" squares from brown grocery bags. Set aside.

3) Lightly trace in pencil the....
a) outline of leaf #1 on the center of your scrap PRINT paper.
b) outline of leaf #2 on the center of your scrap SOLID COLOR paper.
c) outline of leaf #3 on the center of your scrap PATTERNED paper.
d) outline of leaf #4 on the center of your scrap PICTURE paper.

4) Carefully cut the leaf shapes out of each paper piece (so that you end up with 4 leaves in the different paper types).

5) Apply a thin layer of glue to the back side of each leaf cutout. Adhere ONE leaf cutout to the center of each brown paper square. Press firmly and lay book on top so the cutouts dry flat.

6) Once dried, decorate your room for Fall with these pieces or make a book... its up to you! Go a step further and identify each leaf, and label the leaves with their tree :)

Monday, September 8, 2008

Trinket Tin


PROJECT OVERVIEW:
This project has many decorating possibilities! The goal is to convert an empty food tin/canister into a decorative "Trinket Tin" that might keep jewelry, coins, and other trinkets.
TIP: Consider following a theme for your tin to express yourself! For example, if you like cats you could find cat pictures in magazines and glue them to your canister. :) 
Have fun - ANYTHING GOES!!!!

SUPPLY LIST:
- empty tin canister and lid (roughly small peanut size)
- scrap papers
- scrap embellisments (glitter, sequins, stickers, buttons, etc)
- ribbon/bow, etc
- glue or double sided adhesive tape (scrapbooking dots)

DIRECTIONS:
1) Rinse out your tin and lid.

2) Cover the entire outside of tin/canister with scrap papers (using glue or tape). Be creative, there are many ways to cover the tin such as: wrapping with paper, covering with torn paper scraps, etc.

3) Further decorate your Trinket Tin with found embellishments such as: glitter, sequins, stickers, buttons, etc.

4) Decorate the lid with some sort of "topper" such as a bow or ribbon. Be creative, again...anything goes!

5) Set your Trinket Tin aside to dry.

6) When dry, fill with trinkets for safekeeping. Perfect for your bedroom dresser :)

Quilted-Collage American Flag

Photobucket Image Hosting
PROJECT OVERVIEW:
Create an American Flag in a quilted-style using paper scraps from (magazines, mail, scrap drawer, etc). Kids will use the paper pieces as if they were quilt sections. Patch them together on a letter sized piece of paper, glue down and then use permanent black marker to create a stitch-effect (making the flag look like it was sewn together like a quilt).

The quilted style is to symbolize our country's history, representing unity/togetherness and the melting-pot of our citizens.

This project works great as individual or group art. Classrooms and large groups might try this on a large sheet of paper or cardboard to cover an entire wall!

SUPPLY LIST:
- letter sized sheet of card stock or card board
- scrap papers from: magazines, junk mail, newspaper, etc.
- pencil
- scissors
- glue
- black permanent marker

DIRECTIONS:
1) Find a piece of white card stock or heavy white paper to create your flag on. TIP: Cream paper would create an antique-style flag.

2) Lightly draw a flag on your card stock. Kids might want to do an abbreviated version of the flag since it might be hard to include all 50 stars and 13 stripes. NOTE: Kids can be creative with the number of stars and stripes they use. Emphasize the importance of having a red strip on top and bottom (white stripes on the outside will get dirty faster).

3) Find red and blue scrap paper pieces to form your flag with. The white sections = the white of the paper, but kids can use white paper for the star/s if they choose. Cut the pieces out with scissors and sort into a red and blue pile. NOTE: there will be a variety of blues and reds creating the flag. Consider using red/blue sections that have patterns so that it will look like fabric. Avoid using colored sections with text, solid color blocks or color patterns will work best.

4) Glue the pieces down on flag, in quilt-like sections. Start with red stripes first, then the blue section.

5) Let glued pieces dry.

6) Use permanent marker to create a stitch effect at the seam of each quilt section (the seam of each paper piece). TIP: If the flag was done as a group, consider having each kid sign their name or write a short message about America. 

7) Hang up and enjoy!

Sunday, September 7, 2008

Glass Decoupage Vase


PROJECT OVERVIEW:
Recycle a glass container into a beautiful decoupage vase. Glue tissue paper squares onto the glass vase creating a unique color pattern.

SUPPLY LIST:
- Empty glass bottle/container that has the following:
- good vase-like shape
- smooth glass surface (no ridges or bumps in the glass)
- removable wrapper (so that it is a plain glass "vase" when removed)
**WARNING: The safest containers to use are empty food & beverage containers. Do not use a container that held dangerous chemicals/cleaners.

- colored tissue paper (2-5 different tissue paper colors)
- glue
- paper towel
- scissors (optional)

DIRECTIONS: (refer to sketches above)
1) Find a glass bottle with the above qualities to use as your vase. Below are some container ideas for a vase:
- glass salad dressing bottle (some have really unique shapes)
- glass beverage bottle (juice bottles, soda bottles, etc)
- glass vinegar or olive oil bottle (some olive oil bottles have unique square sides)

2) Have an adult rinse out/clean your vase container and peel off the outside label. *TIP: Soak in hot sudsy water to loosen stubborn labels. Let dry.

3) Select several tissue paper colors to design a pattern for your vase. 2-4 colored patterns work best.

4) Rip or cut uniform tissue paper squares to decorate your vase. Squares should be roughly 1/2" x 1/2" size for easy designing. Try to eyeball how many squares your vase will need (this depends on the size of your vase). NOTE: Ripping tissue squares will create a different effect than scissor cutting.

5) Starting from the bottom of your vase up... apply a THIN layer of glue about 1/2 way up the bottle. *NOTE: Do not cover your entire vase with glue or it may dry by the time you are ready to decorate. Decorate in sections instead.

6) Glue tissue squares onto vase pressing slightly on each square so that the entire tissue paper piece is adhered to glass. Dab any excess glue with a paper towel.

7) Create a pattern using the colors you selected. For example: stripes, polka-dots, swirls, squares, hoops, etc. Repeat the pattern until you reach the top of your vase and all glass is covered by tissue paper pieces.

8) Set aside to dry.

9) Fill vase with water and flowers! *TIP: There are many beautiful wild flowers and grasses that make a unique arrangement. Silk flowers are wonderful too!

Tuesday, August 26, 2008

Cookies-In-A-Jar


PROJECT OVERVIEW:
For kids to mix the creativity of baking with art. This project includes: baking terms, fractions, measuring ingredients... as well as how to decorate and be artistic. Keep in mind there are many variations that could be done with this project.

SUPPLY LIST:
- 1 liter glass jar and lid
- scrap decorations: (scrap papers, ribbons, buttons, glitter, etc...)
- brown paper bag
- adhesive double sided tape
- glue
- marker, paint, etc

COOKIE INGREDIENTS:
- 3/4 cup packed brown sugar
- 1/4 cup white sugar
- 1 1/2 cups mini candy-coated chocolates
- 2 cups all-purpose flour
- 1/2 teaspoon baking soda
- 1/4 teaspoon salt

DIRECTIONS:
REMINDER: Wash your hands before you begin and make sure the counter top and supplies used are all clean.
1) Decorate the lid of jar as you wish with scrap decorations. Set lid aside to dry if necessary.
IDEA: Use a 9" fabric circle to cover the jar lid and then tie with ribbon or yarn. Add stuffing beneath fabric to give a puffy look.One 1/2 yard of fabric makes 8 fabric jar covers.

2) In a clean 1 liter sized glass jar layer the ingredients in the following order:
1st Layer (bottom of jar): 3/4 cup packed brown sugar
2nd Layer: 1/4 cup white sugar
3rd Layer: 1 1/2 cups mini or regular candy-coated chocolates
4th Layer: (READ CAREFULLY) **In separate bowl mix: 2 cups all-purpose flour, 1/2 teaspoon baking soda and 1/4 teaspoon salt. Then, add this mixture as the 4th layer in your jar.

3) Create a recipe card for the cookie mix using scrap papers (roughly 3x5 size) and decor. Print or hand-write the recipe listed below so that your gift recipient can easily follow the recipe to prepare the cookie mix. Hole punch upper left corner of recipe card.

RECIPE: Candy-Coated Chocolate Cookies
1. Preheat oven to 350 degrees F (175 degrees C). Line one baking sheet with parchment paper.
2. Empty the contents of the jar into a large bowl and mix until all the ingredients are well combined.
3. Using your hands work in 3/4 cup softened butter or margarine until the mixture resembles coarse crumbs.
4. Beat 1 egg with 1 teaspoon vanilla extract. Work this into the flour mixture until well combined. Dough will be a little crumbly.
5. Shape dough into 1 inch sized balls and place 2 inches apart on the prepared baking sheet. Slightly flatten the balls with the palm of your hand. Bake at 350 degrees F (175 degrees C) for 10 to 14 minutes or until the edges are lightly browned. Remove cookies to a rack to cool. Makes about 2 dozen cookies.
NOTE: Mix is good up to 6 months (without nuts) and 3 months (with nuts).

Wednesday, August 13, 2008

Character Collection


OBJECTIVE: For kids 6+
To explore typography and different fonts by collecting the same letter/character. Kids are encouraged to hunt for unique, funky, different fonts... all of the same letter. Search for different fonts such as: cursive, decorative, bubbly, block, digital, calligraphic, hand drawn, scribbly, etc. NOTE: the differences of each letter are in the SHAPE of the letter (font) NOT the color.

SUPPLY LIST:
- card board backing (cereal box cardboard works great)
- scrap printed materials such as: newsprint, magazines, catalogs, bulk mail, TV guides, etc.
- glue or glue stick
- scissors

DIRECTIONS:
1) Find a piece of card board to use as backing (something roughly letter sized) such as a medium sized cereal box or pasta box (cut out a side of box to use as your backing)

2) Select a letter of the alphabet to "collect" ... kids can do their favorite letter, their initial, it doesn't matter but just choose ONE letter.

3) Go through magazines, newspaper, junk mail, packaging, etc. and cut out a wide assortment of the letter chosen. Aim for 20-40 pieces to design with. NOTE: Don't be concerned with the color of each character, instead - focus on the SHAPE of each character.

4) Arrange the different pieces on top of cardboard backing - don't glue down till each letter is in place... the pieces will need to be puzzled together. Cover the entire cardboard backing - so that there is little space between the letter pieces. Keep the letters upright, so that the fonts can be compared easily (this is a collection of one character in the alphabet).

5) Once the design is configured, glue down each piece. Then, lay a heavy book on top so that it dries flat.

6) Hang on your bedroom wall as modern art. Consider having this framed for an ultra artsy and personalized look! :)

Wednesday, August 6, 2008

Dotted Color Wheel


PROJECT OVERVIEW: For kids 6+
This exercise is an educational way to learn about the color wheel. Further, kids will learn that there are many different shades of each color - thus, no 2 colors are exactly the same even though we classify them as "red" or "blue."

SUPPLY LIST:
- scrap paper (magazines, wrapping paper, junk mail, empty packaging, coupons, etc)
- stiff cardboard or cardstock (letter size)
- hole punch
- ruler
- glue or glue stick
- black pen/pencil

DIRECTIONS:
1) Use a large plastic lid to trace a large circle (using black pen) on your piece of card-stock.

2) Use a ruler and black pen to divide your circle into 6 uniform pie pieces (as shown in attached color wheel).

3) Label each section by color (this will get covered up by paper, just use as a guide). Set drawn out wheel aside.

4) Search through scrap papers (magazines, wrapping paper, junk mail, empty packaging, coupons, etc) to find samplings of the 6 colors on wheel (red, orange, yellow, green, blue, purple). NOTE: you want many different shades of each color... the blue in blueberries is not the same as blue sky.

5) As you find samples of each color, hole punch out the swatches and glue onto the appropriate section on color wheel. Continue to "file" each color sample into the appropriate section on wheel until each color section is completely filled by dots.

6) When dry, label each color section around outer edge as "Reds" or "Blues" ... this shows that there are many variances within each color.

Self Portrait Collage

PROJECT OVERVIEW:
This should pretty much be a free-for-all type thing... focussing on really using found materials to "draw" the portrait. Materials such as: cereal boxes, magazines, newspapers, bulk mail, candy wrappers, caps, buttons, cut plastics (from packaging), labels, fabrics, tin foil, yarn, foam, etc, etc!! Kids are encouraged to find materials with a variety of textures and dimensions. The collage doesn't have to just be made of paper for example... the collage should have a 3D look.

Children can interpret this differently and hopefully use materials that represent themselves... for example, if one's favorite candy is skittles... maybe that makes its way into the collage. The self portrait will most likely look like an abstract version of each child - but could also incorporate their favorite things and hints of their personality/family/home ,etc.

SUPPLY LIST:
- paper backing such as cardboard or cardstock (to build collage on)
- "found materials" such as: cereal boxes, magazines, newspapers, bulk mail, candy wrappers, caps, buttons, cut plastics (from packaging), labels, fabrics, tin foil, yarn, foam, etc, etc!
- glue or tape
- sissors

DIRECTIONS:
1) Find a piece of stiff cardboard to build your portrait on

2) Collect various "found materials" as mentioned above, to build your self portrait. Consider incorporating items that are unique to you or represent you.

3) Use the materials to "draw" your self portrait!

4) Let dry then hang somewhere to express yourself!

REMEMBER:
No rules!! - Except be creative!

A Dozen Months of Fun


PROJECT OVERVIEW:
Use an empty egg carton to create a carton to hold 12 fun things to do, one for each month. For example: go camping.... or build a tree house.

Each compartment in the egg carton will hold a little strip of paper with something fun to do written on it. Then, at the beginning of every month, pull out the slip and do what the paper says!

SUPPLY LIST:
- empty egg carton (make sure it's clean)
- glue or tape
- marker, pen, etc.
- card stock (can be from a recycled material as well)
- scrap paper/construction paper (consider recycling junk mail, unused magazines, newspapers, etc)
- miscellaneous embellishments: yarn, buttons, glitter, confetti, stickers, beads, ribbon, etc.

DIRECTIONS:
1) Cover the top of an empty (clean) egg carton with scrap papers/construction paper. Use junk mail, old magazines, newspapers, etc. when possible. Consider making fun shapes and overlapping to create a unique design, but leave room for the title of this little game, "A Dozen Months of Fun." Decorate the inside if you like.

2) Add "A Dozen Months of Fun" to the top. Do this however you like: with marker, stencils, stickers, paint, cut paper, etc. *One cute "green" idea might be cutting out the letters from old printed materials to form "A Dozen Dinner Topics," then glue to the top of carton.

3) Embellish your carton more with fun/colorful designs formed from: yarn, buttons, glitter, confetti, stickers, beads, ribbon, etc.

4) Create 12 fun things to do for each month. Brainstorm with a parent or sibling so that the whole family will enjoy. Cut 12 small strips of paper (any type), roughly 2"wide x 1/2"high and write a different fun idea per strip.

5) Once your carton is dry and ready to fill, place one fun strip in each compartment... filling all 12. *Fold the strips to fit nicely in each spot.

6) At the beginning of every month, pull out the fun strip and do what the paper says!

Wednesday, July 30, 2008

Torn Paper Monogram Wall Art


Create modern art to decorate your room with a personalized touch! Easy, quick and fun to do!

SUPPLY LIST:
- scrap papers (old magazines, junk mail, newspaper, etc)
- glue
- backing paper (stiffer construction paper, cardstock, etc)
This can be in whatever size you want your monogram to be, letter size, poster size... as big or small as you like!

DIRECTIONS:
1) Select the backing paper you will create your monogram on. Again, make this whatever size you like! Consider cutting a big scrap piece of cardboard into a fun shape like a star or circle... be unique!

2) Using pencil, sketch out the letter for your monogram. Try bubble letters, block, even cursive. Do your first initial, last or all three!

3) Gather scrap papers (old magazines, junk mail, newspaper, etc) to tear pieces of paper from and build your monogram.
Tip: Your monogram will stand out more if just 2 colors are used.


4) Tear uniform scraps from your scrap papers roughly 1" x 1" in size and set aside to use in your design.
Tip: Sort your pieces in color piles, one for your letter and one for the background color.


5) Apply a thin layer of glue to your backing paper.

6) Start adhering torn papers to your monogram, keeping in mind your letter should be a different color scheme from the background. Continue until your entire backing paper is covered.

7) Set aside to dry.

8) When dry, find a fun place to hang... maybe above your bed or on your bedroom door. :) You might even want to frame for a professional look!

Thursday, May 8, 2008

Mother's Day (Yogurt Container) Seed Pots


These precious little seed cups make a great gift for Mom... any day, or for Mother's Day!

SUPPLY LIST:
- empty yogurt-sized containers (mini or regular size)
- popsicle sticks (one for each yogurt container)
- dirt (just enough to fill each cup)
- flower seeds or small annual plants
- glue or tape
- sisors
- acrylic paint
- embellishments (scrap paper, rhinestones, glitter, ribbon, buttons, beads, glitter-glue, confetti, stickers, etc)
- empty 2-liter bottle (*optional to create mini green house)

DIRECTIONS:
1) Wash out an empty yogurt-sized container and dry thoroughly.

2) Paint the container using acrylic paint, set aside to dry.

3) Embellish the container with (scrap papers, rhinestones, glitter, ribbon, buttons, beads, glitter-glue, confetti, stickers, etc). *If your container has a plastic lid, consider decorating to use as dish underneath pot.

4) Set decorated pot aside to dry.

5) Fill pot with potting soil.

6) Plant either seeds or small annual flowers and water.

7) Use a popsicle stick (or something similar) to label what you have planted, and stick in pot.

8) *Place decorated lid beneath pot (to act as dish).

9) Give Potted plant to Mom for Mother's Day! :)

DESIGN SUGGESTIONS:
- Explore patterns when embellishing your pots.
- Create a spring-theme (bunnies, flowers, bugs, butterflies, etc).
- Write a Mother's Day message on your pot.
- Use the empty seed packet you planted as an embellishment on your pot!

Tuesday, February 5, 2008

(Grocery Bag) Valentine Mobile


This Valentines craft is easy to make and the mobiles look beautiful hanging in groups (such as in a classroom).

SUPPLY LIST:
- brown grocery bags (2)
- 3 plastic bags
- stapler
- yarn (roughly 2 feet)
- construction paper
- glue or tape
- glitter & glue -or- glitter pens/paint

STEPS:
1) Cut 2 heart shapes out of a brown paper bag, using the first as a template to create the second. Lineup the hearts and staple the bottom/sides together (leaving the top open). Use a plastic bag as stuffing in the brown paper heart. Make sure the entire plastic bag is inside heart shape and staple the top shut forming a "pillow."
*Repeat step #1 twice to form 3 heart pillows. The three hearts can be all the same size or different.

2) Using your stapler, attach the three hearts with yarn. Form a loop at the top of first heart.

3) Decorate your hearts using construction paper shapes in varying colors. Use glue or tape to adhere your construction shapes to hearts. Be creative! We used: polk-a-dots, hearts and lips.

4) Add a glittery shine to your heart mobile with glitter & glue, or glitter markers/sticks.

5) Lay your mobile out on flat surface to dry.

6) Once the front of mobile is dry, flip over and repeat steps 3-5.

Still having fun? You don't have to stop here! Look around for fun items to embellish your mobile with! These make great classroom decorations or gifts!

Monday, February 4, 2008

Design Tips 1-5

1) Mix & Match
Mix & match anything! Anything goes here! - colors, textures, patterns, mediums, etc. This will help create visual interest and unique art :)

2) Be Daring
Do something different! Just because hearts are usually red or pink, doesn't mean you can't make one blue or green! Be brave, try something new! There is no "wrong way" and no one right way (just your way).

3) Use YOUR Imagination
... not someone else's. The most unique and interesting ideas come from your imagination - so use it! Don't be a copy cat, be original and unique!

4) Do What You Like
Design & create based on what YOU like. So, if you like ladybugs... try incoporating them into your creation. If you love the color yellow, use a lot of yellow!

5) Be Resourceful
Have a lot of ugly brown paper or tons of brown paper bags? Supplies that aren't so "pretty" can often be a great start for a new look. Stretch your imagination to use something in a new way.

Friday, February 1, 2008

(Soap Pump) Creatures


©2007 Broken Box Designs™

This is a super easy, unique kids' art project that recycles empty soap pumps into a useful soap pump/lotion bottle for kids! Below is all the information needed to get started!

SUPPLY LIST:
- empty soap pump/bottle (plastic)
- colored craft feathers
- 1 pipe cleaner
- 2 wiggly eyes
- clear packaging tape -or- hot glue gun (with parent supervision)
- glue
- (optional) foam plate or clean empty container

STEPS:
1) Rinse out an empty soap bottle pump and peal the labels off sides if possible.
2) Select medium sized (2-3 inches long) colored craft feathers to cover your bottle.
3) Tape feathers around the plastic sides of your bottle with clear packing tape. Adhere feathers as far up the bottle as you wish and have fun creating a colorful feather pattern!
4) To create arms...cut pipe cleaner in 1/2. Bend about a 1/2" of pipe cleaner to 90 degree angle, and twist the remaining length around your finger or a pencil to create twirl.
5) Tape the short straight part of pipe cleaner to bottle (wherever you would like your creature's arms).
6) Glue 2 wiggly eyes to top of pump with small dots of glue. Set aside to dry.

WANT TO GO A STEP FURTHER?:
7) Use a foam plate or empty clean empty foam container to create feet for your creature! Simply cut out 2 feet shapes and tape to the bottom of bottle.
8) Add some hair to your creature by taping a little feather, ribbon, or yarn behind wiggly eyes on pump.

Have fun, use your imagination & BE CREATIVE!

Funky Pen & Pencil (Coffee Can) Container


©2008 Broken Box Designs™

New Year's Resolution: "Get Organized Kids!" Eliminate clutter and organize your desk with these fun to make pen/pencil containers. Plus, ad a little pizzaz to your desk with bright colors and shiny embellishments!

SUPPLY LIST:
- empty coffee canister (was with soap before using)
- scrap paper (from magazines, catalogs, junk mail, construction paper, etc)
- washable markers
- tape or double sided adhesive dots (find in scrapbook aisle)
- plastic beads, rhinestones, buttons, or any other fun embellishment

STEPS:
1) Peel off coffee label if possible and clean canister w/soap and water. Towel dry.
2) Pick a fun colored paper or patterned paper and cut a piece of paper to wrap around canister as covering. Tape one end of the paper to the other to secure in place. Glue also works on the canister to secure, but is a little messy.
3) Decorate outside by taping fun colored papers, patterns, shapes, and decals to canister. Be creative and remember that anything works! Have fun mixing funky colors and patterns to create a unique piece of art!
4) Finish off your design with little buttons, rhinestones, glitter, yarn, beads or whatever else you want!
5) Doodle designs, your name maybe? with colorful markers or crayon. This really adds that unique touch!
6) Finished! Now just toss in your pens, pencils, sissors, etc and plaace this on your desk to stay organized.

Have fun!! :)